| Machine | Studio/Silver Reed SK 150/1 with ribber |
| Size | Finished width 45 1/2 inches Finished length 23 inches |
| Material | Originally made in Bramwell's Opal 114 small pearls |
| Tension | 16sts and 22 rows to 4 inches on T3 |
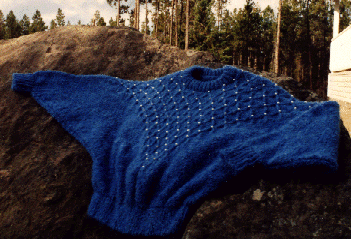
Smocked Pearl Batwing Sweater by Roni Knutson
|
|
|
Back
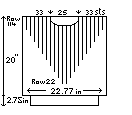
Cast on 91 sts (45-0-46) in 1x1 rib. Rib 19 rows (includes 4 cast on rows) at Tension 1/1. Transfer ribber sts to main bed. RC000. Tension 3. Knit 22 rows. Mark sides of sweater with yarn. Knit straight to Row 114. Take shoulders off on waste yarn (33 sts each) and neck area (25 sts).
Front
Cast on 91 sts (45-0-46) in 1x1 rib. Rib 19 rows (includes 4 cast on rows) at Tension 1/1. Transfer ribber stitches to main bed. RC000. Tension 3. Knit 22 rows. Mark sides of sweater with yarn markers. Bring up ribber.
Transfer 3rd st to R of '0' to ribber and 2nd st to L of '0' to ribber. Knit 6 rows - pulling work down with your hand a little in the centre or add light weights. Transfer 4th st to R and 4th st to L of last stitch transferred, to ribber. (I would suggest you mark every 6th row right at the transfer or you will find yourself counting rows when you come to do the smocking.) Continue to transfer every 4th st to R and L of first two transferred to ribber with 6 rows in between. Adding weights as needed, continue to Row 94.
Neck Shaping - Continuing in pattern, put all needles to L of '0' and 6 to R of '0' to D (holding position). Working on the R side of neck, decrease 1 st at neck edge on next 7 rows - knit straight to Row 114. Take off on waste yarn (33 sts). Do other side to match, putting 5 sts to L of '0' to D rather than 6.
Sleeves
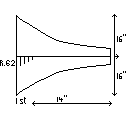
RC000. CAL. Cast on 1 stitch (25th needle L of '0'). Knit 1 row, increase one st to R of 1st stitch. Continue to increase 1 st at R until you have 40 sts. (Row 40.) Then increase 1 st every 2 rows until you have 50 sts (Row 62). Knit straight to Row 68.
Bring up ribber. Transfer 2nd st from L onto ribber. Knit 6 rows. Transfer 4th st to R of last st transferred, to ribber. Continue in this manner to Row 92. Transfer ribber sts to main bed.
RC000. Knit 30 rows straight. Decrease 1 st at R side every 2 rows until you have 40 sts, then dec 1 st at R side every row for 40 rows (92rows). Cast off.
Make second sleeve to match, reversing increases and decreases. i.e., CAR cast on 1 st (25th needle to R of centre) knit 1 row, increase 1 st to L of first, etc., etc.,
Neckband
Join one shoulder. Put sts for neck on machine, wrong side facing, picking up 6 sts each at L and R of front. (i.e., Back 24, Front 6, 24, 6 for a total of 60). Divide for 1x1 rib. Rib 17 rows graduating from Tension 3/3 to Tension 0/0 and back again. Pick up sts from first row of rib and put on needles. Knit 1 row and link or latch off loosely. Sew other shoulder seam.
Cuffs
Cast on 32 sts in 1x1 rib at Tension 1/1 and rib 19 rows as before. Pick up loops from sleeve edge (wrong side facing) and put on needles - knit 1 row and link or latch off loosely. Sew underarm seam.
Smocking and Pearls
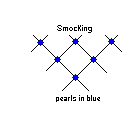
Using yarn begin smocking 6 rows up from the start of the single ribs (not the waistband) - if you marked the rows when knitting this will go faster. Pull together the ribs and stitch. Do not cut ends off but move up next 6 rows to next markers and sew ribs together again to form diamonds (see diagram). Continue on up to top of sweater. Using a finer matching yarn go back and sew pearls (or beads if preferred) on top of each join. (If you have a very closely matching finer thread then the smocking and the sewing on of the pearls can be combined).
 |
 |
 |
The inspiration for this sweater came from Simplicity Knitting - Issue #19
This pattern was first published in The Carriage Trade, Issue #36, September 1990
| Copyright©rvk Sept 1990 |